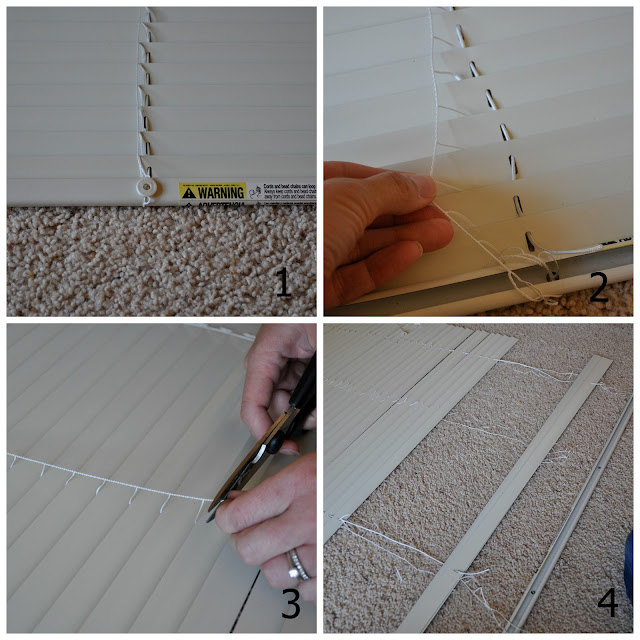
The first thing we did was take down her existing mini blind because we were going to use that to make the roman blind. We laid it out on the floor and opened it up. You can also take off the wand that controls the direction of the slats, you won't need that anymore.
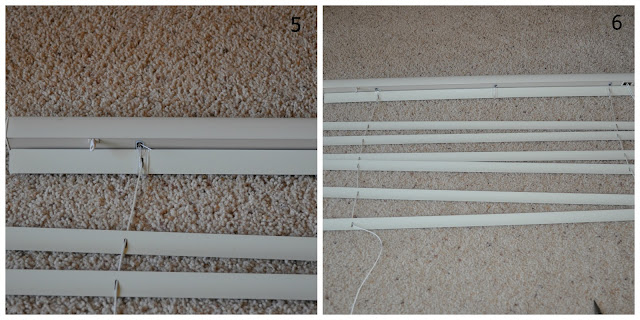
(1)We took out the buttons on the bottom that are holding the strings onto the bottom rail. We cut off the knot then took off the bottom rail. (2) Locate the ladder string and pull it away to separate the strings. I am holding the ladder string. (3)The next step is to cut the ladder string that is holding all the individual blinds in place. But be careful NOT to cut the pull string, it is the thicker one. If you cut it you can't raise and lower the blind anymore. (4) You can remove at least half of the slats. We will figure out how many you want to keep soon.
(5) The top slat on our blind was attached in place so I cut that one off. You don't need a slat that high up.
(6) Here is a picture of the blind with just a few slats left.
The window measured 33.5" wide by 39" tall.
(7)We took our piece of fabric and folded it in half and then cut off the top so it was square. We used a quilters square and rotary cutter, but you could always mark it with a pencil and cut with scissors. (8) While the fabric was still folded in half we measured the desired width and marked it in several places down the fabric. (9) I cut the fabric using a quilters ruler and rotary cutter, lining up all the pencil marks with the ruler. Again you could mark your fabric and draw a line down the fabric and cut along the line without using a rotary cutter or ruler. I didn't have them when I made my first roman blind and it worked just fine. We added an extra inch on each side, so two inches extra, to allow for the hem. We added 3 extra inches to the length since the fabric will wrap around the bottom slat. So the total size of our fabric was 35.5" wide by 42" tall.
Once you have your fabric cut it is time to hem all the edges. (11)We used Heat N Bond fusible tape. It is a super easy iron on hem tape. (10) I started with the sides. I folded the fabric over an inch with the help of a ruler and ironed it in place. (12) I ironed the width of the fabric then I went back and put the Heat N Bond under the flap I just ironed, and ironed it again. (13) Now it should stay in place.
(14) Do that to all four sides. (15) The next step is to put your fabric face down on the floor or counter or where ever you are working and lay the blind on top of it. Make sure you lay the front of the blind down on the fabric. You can remove at least half of the slats from the strings. The slats should be about 7-9 inches apart depending on how big you want your folds and the length of your blinds. It would be nice if you had a number that divided evenly. We did not. We decided to space our slats a little less than 8 inches apart. I first spaced the slats out so I could see how they would look before gluing them down.
(16)Then I place the the top rail along the top of the fabric and glued it down using Fabri-tac glue. (17) After letting it dry for a few minutes I measured 7 7/8" down the edge of the fabric and marked it with a pencil. I did this down both sides of the fabric all the way down. Now our bottom space between the last slat the the bottom bar was less than 7 7/8" but we would have had to space them apart a lot more or a lot less in order to get them to be all the same. Once the blind it up you really can't tell the bottom space is different.
(18) We lined up our slat with the pencil marks and double checked the measurement. (19) We then turned the slat over so the convex or curved out side was up and added a bead of glue along the whole slat.
(20) We made sure not to glue the string and left a little space around the area where the string runs through the slat. (21) We flipped the slat over and pressed it down and then made sure the string was free to move by pulling it back and forth. We continued gluing all the slats down.
(22) At the bottom we put the bottom slat back on and fed the string through the cap and tied a knot in the string. (23) Then we pushed the cap back in place to secure the string. (24) We lined up the fabric at the bottom.
(25) We added glue along the bottom of the rail and pressed it to the fabric. (26) Since this part of the blind is not flat we held it together with clothes pins and propped it up with glasses. It doesn't take long to dry.
Then we finally get to hang it up. It only took a few hours to make this blind and I am pretty sure it would take less time without 3 little kiddos hanging around. We are so pleased with how it looks, it adds so much color without much money.
Have you made blinds or drapes? They make such a difference.
Please let me know if you have any questions.

Linked up over at: Shabby Creek Cottage, Yesterday on Tuesday, Imparting Grace, A Glimpse Inside, Liz Marie Blog, Suburbs Mama, It's Overflowing, Be Different Act Normal, Or so she says, Uncommon Designs, Craft O Maniac, Skip to my Lou, Keeping it Simple, Yesterday on Tuesday, A Stroll Thru Life, Ella Claire, DIY by Design, Handy Man Crafty Woman, Cherished Bliss, Lamberts Lately, The Frugal Girls, One Project Closer, Blackberry Vine, Hope Studios, Life Inspired


How perfect is this. I love it. Thanks for the tutorial. Thanks tons for linking to Inspire Me. Hugs, Marty
ReplyDeleteIt amazes me how simple making your own roller blinds looks and when you do it yourself they're made to measure too! Only thing I'd suggest is making sure you get a safety device for if you have children around to prevent any cord accidents.
ReplyDeleteThat looks great and thanks for the tutorial.
ReplyDeleteSet
ReplyDeletemade popish roman
blinds are an superior secondary to tralatitious window coverings
much as slatted blinds and curtains. Romanist blinds in solon are sold in
generic sizes and emblem, but they can usually be pattern fit to a part pane
and this is what is commonly meant by the point "waiting
prefabricated" papistic blinds. The multitude are many of the benefits of
ready prefabricated papistic blinds.Classic GOOD Sensing Ripe made romanist blinds
make a creation visage. Supported on pane coverings that were utilised in
ancient Roma, they fuck an earthy and artist name that is wonderful to behold.
They incline to utilise apartment a elegance and artistic sensing. Coming in a
difference of colors and styles, they are varied and bonny window coverings
that relinquish heat and a module of call to most any domiciliate. https://www.dayblinds.co.uk/