Showing posts with label Christmas. Show all posts
Friday, December 20, 2013

Make your own Gingerbread snow (glue)


Every year about this time, we make gingerbread houses. Now it is one of the tickets they pull out of their Advent Calendar.  It is always a highlight for the kids (and my husband). We used to buy a kit but as the kids got older they each wanted to make their own house. So we moved to small houses so everyone can have their own.


gingerbread house snow (glue) - the colored door

I buy a few bags of candy for decorating (and eating).

gingerbread house snow - the colored door

Gingerbread house candies - the colored door

I put the icing in a zip lock bag and cut a hole in one corner. Each house gets their own bag of "snow". The recipe for the snow is below.

Gingerbread house snow (glue) - the colored door

We pass out graham crackers for each house and let the kids go to town. How cute, little sister is helping big sis with her house. I just love how helpful these two girls are. 

Gingerbread house snow (glue) - the colored door

And here is big brother working on his creation. The glue works really well, you don't have to hold it  long before it sets up a little. The kids had a really easy time working with it. 

Gingerbread house snow - the colored door

And here are our finished houses. Some cute houses there, and my chalkboard runner is the perfect place to display them. I think these houses have already been nibbled on, so it is a good thing I got pictures before they were turned to rubble. The other perk of making your own is getting to eat them. The kits never tasted that good so it just sat on the counter for weeks as candy was picked off.  These will be eaten within the next few days.

Gingerbread house snow - the colored door

Gingerbread house snow (glue) - the colored door

Gingerbread house snow (glue) - the colored door

Now for the recipe:

Snow Frosting

3 egg whites - at room temp
1lb (3 1/2 cups) of powdered sugar
1/2 tsp cream of tartar

Place egg whites, sugar and cream of tartar in a large bowl. Beat at medium speed for 7-10 minutes or until mixture is very stiff. Store in a sealed container.
It makes about 2 cups

We made 4 houses and had plenty left over. It was super easy and tastes pretty good too.

Do you make gingerbread houses? Do you use a kit or make your own?

Happy Building!


Sharing over at: Jennifer RizzoThe 36th AvenueLife on Virginia StreetAroma of himTatertots and JelloDelineate your DwellingDIY ShowoffFlamingo ToesI should be mopping floorThrifty Decor Chick
Thursday, December 19, 2013

2013 Christmas Tour


Well, Christmas is in about a week which is such a good feeling because at this point whatever is not done probably won't happen and that is just fine. I am done scrambling around and I plan to enjoy the rest of this time doing some fun stuff with the family. Ahh it feels so good. Their is too much business this time of year.  We have some beautiful snow and it is finally warm enough we can go outside and play in it. It is hard to believe I look forward to 30 degree weather!

I wan't sure I would do a Christmas tour because after taking all my pictures my tour just doesn't compare to a lot of other tours out there. But I decided to just go for it and it would be fun to compare the years down the road. I like decorating for Christmas but I don't love rearranging the whole house for it, and I don't love taking it all down in January. So I always keep that in mind when I decorate.
So here is goes, not the most glamorous but it works for us.

Christmas tour 2013- the colored door


In our office I hang a wreath on our chalkboard with some ribbon. The ribbon usually changes color every year. I love the Joy in the middle, it is so simple.

Christmas tour 2013 - the colored door

Christmas tour 2013 - the colored door

In our family room I add greenery, ornaments, vintage blue jars and pinecones to the box under the TV. I found these huge pine cones at Hobby Lobby last year, I love them.

Christmas tour 2013- the colored door

Christmas tour 2013 - the colored door
I made a sign with chipboard letters I found at Target. I explain more about it here. I added some greenery to the top of our curio cabinet from the clippings of our Christmas tree.  One of the few perks of having a real Christmas tree is adding real greenery to rest of the house.
Christmas tour 2013 - the colored door
I added some garland to our banister with green ribbon. I used green pipe cleaners to attach the garland to the banister then tie a bow over top. Red is not my favorite color so I opted for green and gold this year. Red always sneaks its way in though.


Christmas tour 2013 - the colored door


I added just a few things to our half bath. I love these jewel tone ornaments I found last year. Maybe next year I will do jewel tones all over, they are so pretty!

Christmas tour 2013 - the colored door
In our kitchen I added some garland above the cabinets and ornaments in the containers.

Christmas tour 2013 -  the colored door

 Christmas tour 2013 - the colored door


Here is our hot chocolate bar. With all this cold weather, it is getting used a lot. It is so much easier having everything out and available.
Christmas tour  2013 - the colored door
I reused some of the elements from my winter centerpiece, as seen here, on my island.
Christmas tour 2013 - the colored door
Here is our only tree, which is not perfect and mostly full of ornaments the kids have made. And I love it! You probably can't tell but a lot of the ornaments are hanging all together because that's how the kids did it. Another thing you probably can't see is that most of the needles are on the floor! Oh someday maybe I can talk my husband into a fake tree. The needles drive me crazy!

Christmas tour 2013 - the colored door


Christmas tour 2013 - the colored door
I wasn't going to put my Christmas village up this year, but as it turns out it is the kids FAVORITE thing. I never would have guessed that, so up it goes. They love all the lights in the houses. And it was my Grandmas so it is nice to think of her when I look at it.

Christmas tour 2013 - the colored door


Christmas tour 2013 - the colored door

Well that is it, nothing too fancy and lots of room for improvement next year.

Once I get over all the pressure that comes with Christmas and really remind myself it is about the giving and kids, it is so much more fun. I love listening to the kids talk about Christmas because the excitement is really building now. Only two more days of school until Christmas break and snow is in the forecast, which makes it even more fun for them.  The kids are so excited, their excitement is contagious! Their is nothing better than Christmas morning, ok now I am getting excited! I better get wrapping.

As always have a wonderful day!!


Sharing over at: Imparting GraceMy Girlish WhimsCherished BlissLiz Marie BlogJennifer RizzoEvolution of StyleThe 36thg AvenueLife on Virginia StreetAroma of HimTatertots and JelloDelineate your dwellingDIY ShowoffFlamingo ToesI should be mopping the floor


Thursday, December 12, 2013

Peace and Joy (chipboard letters)


I don't go into Target a lot (they have too much fun stuff there) but when I do, I always check out the dollar section. Sometimes I find great stuff, sometimes not. On this trip I found some silver chipboard letters, score!

fun with chipboard letters - the colored door

I bought two packages in case what I wanted to spell needed two letters. Now I wish I bought 3 because Merry Christmas has 3 R's. Bummer.  I found the bakers twine at Hobby Lobby, they had lots of colors.

Chipboard letters - the colored door

So I went for "Peace and Joy" and I love how it turned out. It was such a simple craft. I used a small hole punch and just thread the bakers twine through, super fast and simple.

Fun with Chipboard letters - the colored door


Fun with Chipboard Letters - the colored door

I used some clippings from our Christmas tree to decorate in and above our curio cabinet.

Christmas decor - the colored door


Christmas decor - the colored door

You can see in the background I now get to use my thankful frame for Christmas cards. I love having a place to display the fun pictures and cards.

Fun with Chipboard letters - the colored door

For the letters that only needed one hole punch I taped the back to the string so they would lay flat. If you look close you can see the tape.

Fun with Chipboard Letters - the colored door

Two weeks left until Christmas and my house is finally decorated. Now the wrapping of presents begins. One of these years I am going wrap as I buy so I am not so overwhelmed. Someday.

Fun with Chipboard Letters - the colored door

I wish your family all the peace and joy of the season!


Sharing over at: Imparting GraceLiz Marie BlogOne Project CloserThe Shabby NestUrbane JaneTatertots and JelloThe 36th AvenueYesterday on TuesdayHome Stories A to ZLove Grows WildStone Gable BlogSo much better with ageLil Mrs.ToriCarolyn's homeworkHope StudiosCoastal CharmHi SugarplumA few minor adjustmentsFunky Polkadot GiraffeA stroll thru lifeHandy man Crafty WomanDIY by DesignOh my creativeMy Girlish WhimsThe Life of Jennifer DawnThrifty decor chick733 blogA glimpse insideCherished BlissJennifer RizzoLife of Virginia StreetFlamingo ToesI should be mopping the floor
Tuesday, December 10, 2013

Advent Calendar with Less Gifts (aka Junk)


Well just like most of the country, bitter cold weather has arrived, brrr. We did get several inches of snow last night which was so pretty to wake up to though. It always feels more like Christmas with a little white stuff on the ground.

Do you do Advent calendars?

I didn't as a kid but my husband did and talked about how fun it was. So we started doing an Advent Calendar with our kids about 5 years ago. We only had two kids with one on the way. But as the kids have gotten older I find the Advent calendar is a source of stress for me. It is hard to find small things that fit in the pockets and the cost really adds up with 3 little ones. So last year I started something new. The pockets are now filled with holiday activities (most of which we were already doing anyway) and a few treats and gifts. It was so much nicer last year and we had less little trinkets of junk by the end of it. I love it now and the kids still really enjoy digging into the pocket to find their treasure.

Advent calendar - the colored door

Each day is filled with either a small piece of candy or maybe a small gift like football cards, pony tail holders, bracelets or small lego kits. And the other half or so are filled with cards that list an activity. I printed activities on card stock and reuse them each year. Some we use more than once, like family movie night is used most Fridays or Saturdays. And sometimes there isn't snow before Christmas so sledding doesn't make it in.

At the end of November I write out a master list for the month noting what treat or activity will happen on which day. That way it is done and I can fill the pockets and refer to the list if I need to. There are always some activities that need to be done on the weekends because they are a craft or baking cookies or might make for a later night like movie night. Then I can make sure to schedule everything. The best part is we were already doing most of these activities so it hasn't added to the busyness I have just scheduled then now.

advent activity cards - the colored door

As for the Advent calendar itself, I did make it. It was 5 years ago and it has held up really well. I saw one like it in the pottery barn catalog(I think they still have them) and thought "I can make that". It is all made out of craft felt, thread and a few beads.

Advent Calendar - the colored door

The pockets were really fun and time consuming to make. I found templates online and tried to look for things that had meaning to us. My son has a blue puppy he sleeps with that looks a lot like the one below. There are three stocking for the 3 kids.

Advent Calendar - the colored door


Advent calendar - the colored door


Advent calendar - the colored door


Advent Calendar - the colored door

I could not have finished this project with out my Mom though. She really helped with the shape of the tree and she sewed all the pockets on as well as the embroidered the numbers, snowflakes and our name at the bottom. This tree is so special to me. And every year it is fun to bring out, and every year the kids pick their favorite pockets.

Some of the pockets have gotten a little stretched out from eager little hands but after 5 years it is doing pretty good.

Advent Calendar - the colored door

Advent calendar - the colored door

Advent Calendar - the colored door

Do you celebrate advent with your family? Did you as a kid or is it a new tradition with your family?
As always please let me know if you have any questions and have a wonderful day!


Linked up at: Cherished BlissLamberts LatelyA Glimpse InsideSomeday CraftsImparting GraceLiz Marie BlogOne Project CloserThe Shabby NestUrbane JaneTatertots and JelloThe 36th AvenueYesterday on Tuesday


Tuesday, November 26, 2013

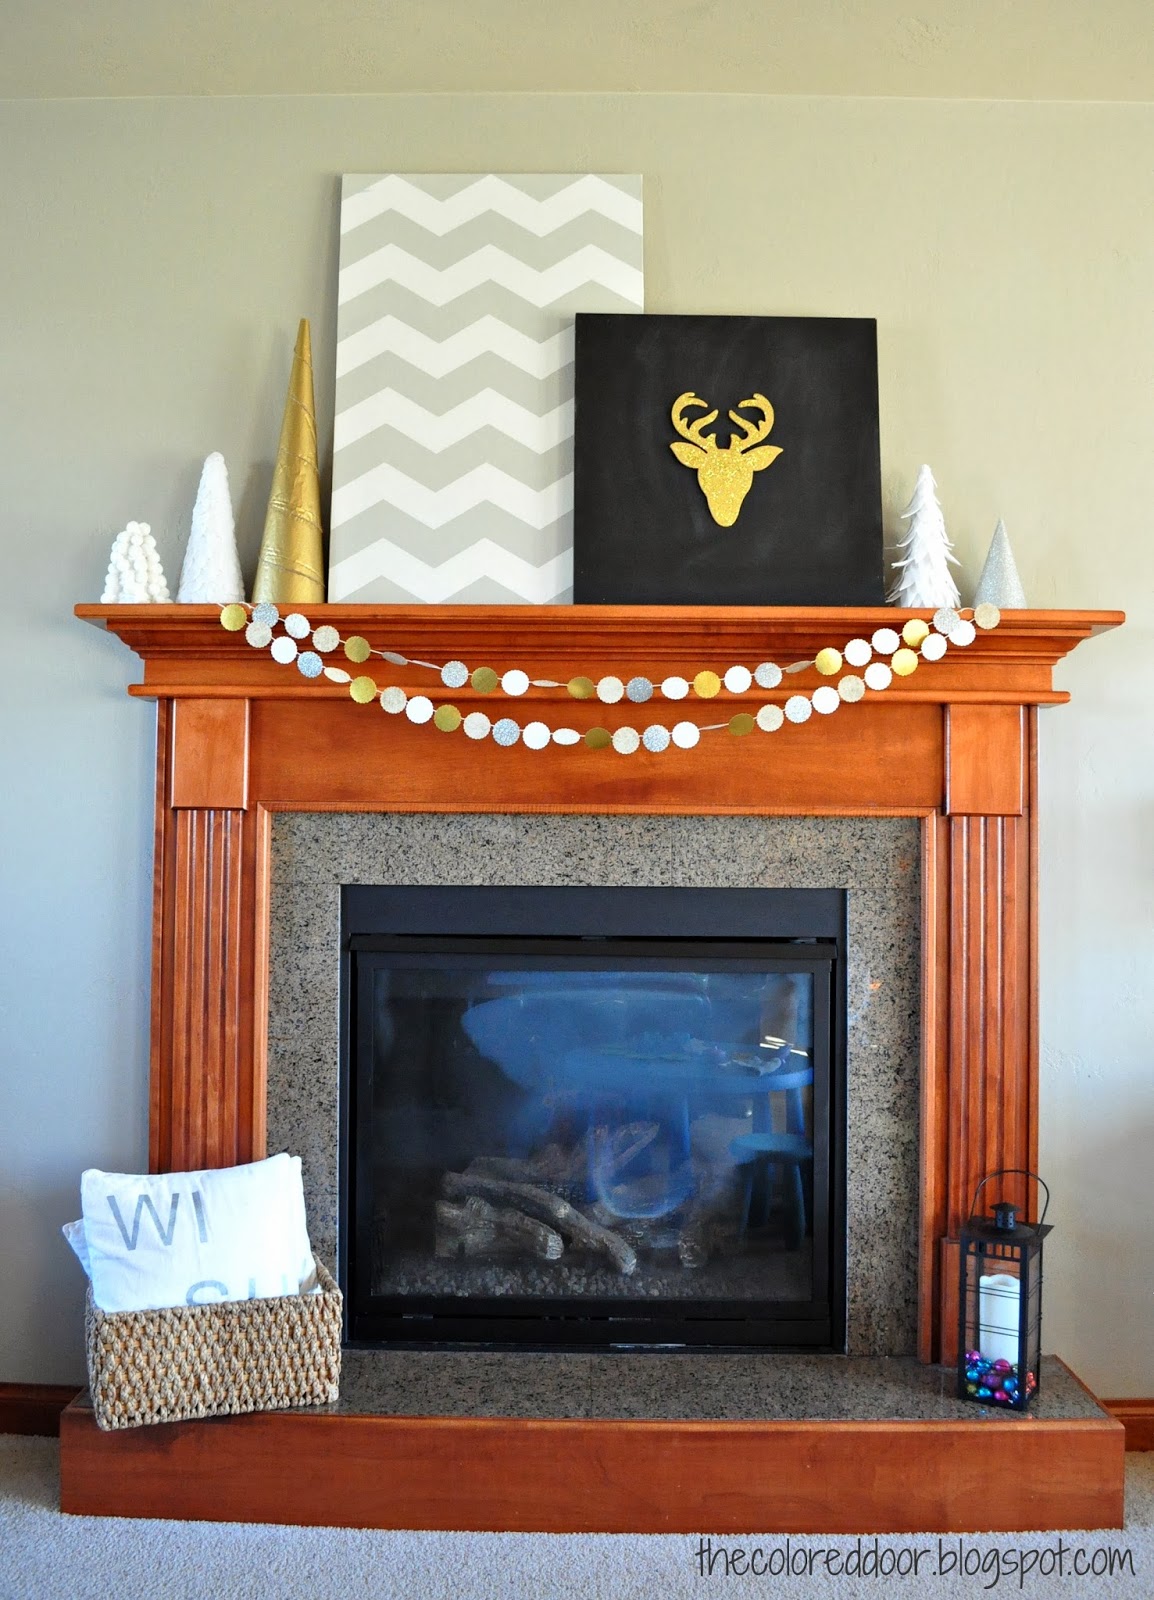
Christmas Mantle


We are not hosting Thanksgiving this year, so I could get a head start on Christmas decorating. Thanksgiving is so late this year I can't believe when we return from visiting family it will be December. It will be nice to come home to Christmas decorations though, then all we will need is a tree. We always get a real tree so I always try to wait as long as my husband will let me, because the needles everywhere drive me crazy.

I was going to add more color and move away from traditional colors but once I started putting things together I just loved the simple elegance of the gold and silver.

Christmas Mantle 2013 - the colored door

I love all the Christmas tree decorations everywhere. I got some of my ideas from Sarah over at Winthrop Chronicles. They are so easy to do and I just used what I had on hand to make all of mine.

The small tree on the right is silver glitter scrapbook paper I made into a cone, trimmed off the bottom and hot glued. The feathery tree is made with a piece of 12x12 white card stock wrapped into a cone and glued. I used white felt I had on hand, I cut them into triangles and hot glued just the ends on and then pulled them out away from the cone. It came out better than I expected.

Christmas Mantle 2013 - DIY trees - the colored door

The little one was again made with a piece of card stock and I had some left over pom pom trim that I just wrapped around the cone and taped. (I think it is a yard) Doesn't get much easier than that. The middle tree I made last year and actually used a real foam cone, silly girl. I loved the circle trees from the Land of Nod but knew I could make them myself. So I cut a million circles out of white felt and pinned them onto the foam cone. I also added a piece of felt to the bottom so it was totally finished. I love how it turned out!
The last cone was crazy easy. I used a large poster board to make the tree, then wrapped it with gold tissue paper and wrapped a piece of twine around from top to bottom. Told you it was easy.

Christmas Mantle 2013 - DIY trees - the colored door


 I love this mantle and I am so glad I get to enjoy it for the next month.

Christmas Mantle 2013 - the colored door

I made the garland with a 2" circle punch and a variety of gold, silver and tan scrapbook paper. I just taped mine on some string. Someday I won't be so lazy and will pull out my sewing machine to stitch them together, I love that look.

Christmas Mantle garland 2013 - the colored door

Christmas mantle garland 2013 - the colored door

Christmas Mantle 2013 -  the colored door

Have you finished your Christmas mantle or are you waiting until after Thanksgiving?


Someday I'll Learn
House on the Way
A Sweet Fragrance
Linked up at: Cherished BlissSkip to my LouMad in CraftsSo much better with ageThrifty Decor Chick4 You with LoveHome Stories A to ZCupcakes and CrinolineMy Uncommon slice of SuburbiaSomeday I'll LearnBlackberry VineLil Mrs. ToriHope StudiosA Stroll Thru LifeOh My CreativeDIY by DesignHome Coming MNSomeday CraftsThe Happy HousieThe Life of Jennifer DawnMy Girlish WhimsA glilmpse insideImparting GraceLamberts LatelyLiz Marie BlogThe Shabby NestTatertots and JelloChild at HeartUrbane JaneThe Better Half36th AvenueThrifty decor chick Christmas party
Related Posts Plugin for WordPress, Blogger...